

Discover the essential guide to software prototyping—what it is, key benefits, and types to choose from. Learn a proven 7-step process to create effective prototypes that reduce development costs, improve user satisfaction, and increase project success. Whether you’re a startup or enterprise, find best practices and expert tips to streamline your software development and build products that truly meet user needs.
Don’t want to spend thousands (or even millions) of dollars building the wrong product?
Struggling to explain your idea clearly to developers or potential investors?
Are you unsure of how the users will interact with your solution?
Is your software development team moving too slow in the concept phase?
Need something more than just slide decks to gain investor buy-in, feedback, or raise funding?
Should you do it in-house or partner with a software prototype development services provider?
This blog has answers for you.
Let’s quickly begin with understanding what exactly software prototyping is.
What is Software Prototyping?
Software prototyping is the process of creating a simplified, interactive preliminary version of software in the early stages of the development process. It allows teams to explore design ideas, visualize functionality, test user interactions, and validate key features early, without writing production-level code.
Prototypes can range from low-fidelity wireframes to high-fidelity clickable mockups or even partially functional systems. The goal is to explore ideas, gather feedback, and identify improvements quickly so you can build the right product before building it the “real” way.
By simulating the user experience and core workflows, software prototyping helps bridge the gap between initial concepts and final solutions, reducing ambiguity and aligning business, design, and engineering teams from the start.
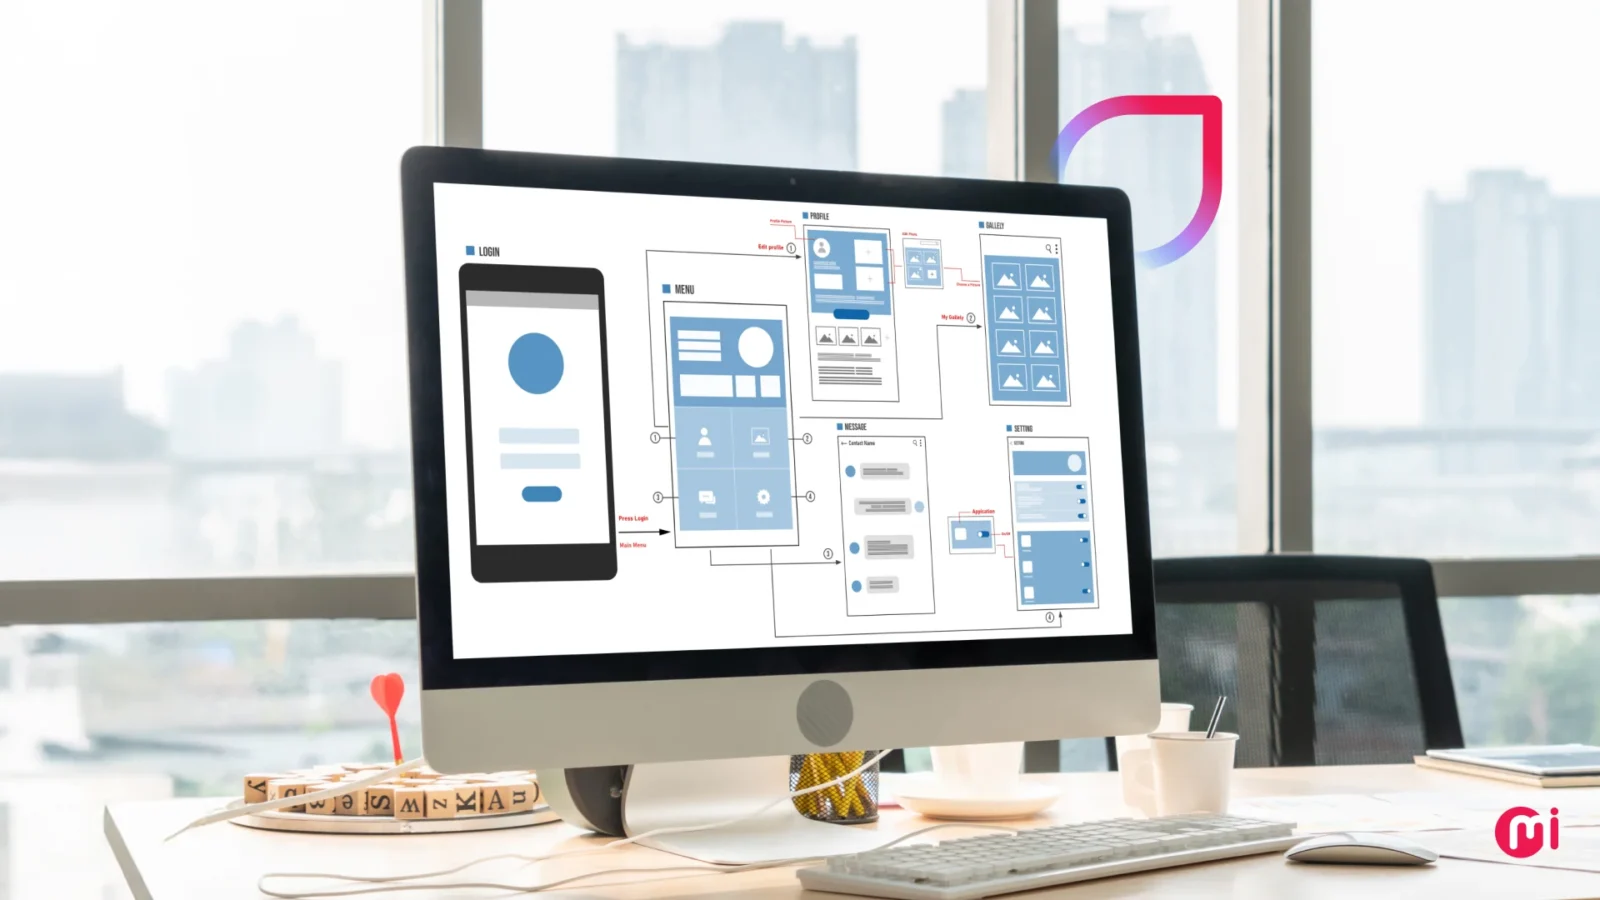
Wondering what prototypes look like? Our team, as a part of the UX design process for a recipe app, created a prototype of how the home page interactions would feel. Take a look at the home page interactions prototype.
Benefits of Prototyping in Software Development
Prototyping offers more than just a visual draft of your product—it’s a strategic tool to validate ideas, uncover issues early, and align teams before serious development costs kick in. Whether you’re building an MVP or scaling an enterprise platform, prototyping helps reduce risk, speed up decision-making, and build better software from the start.
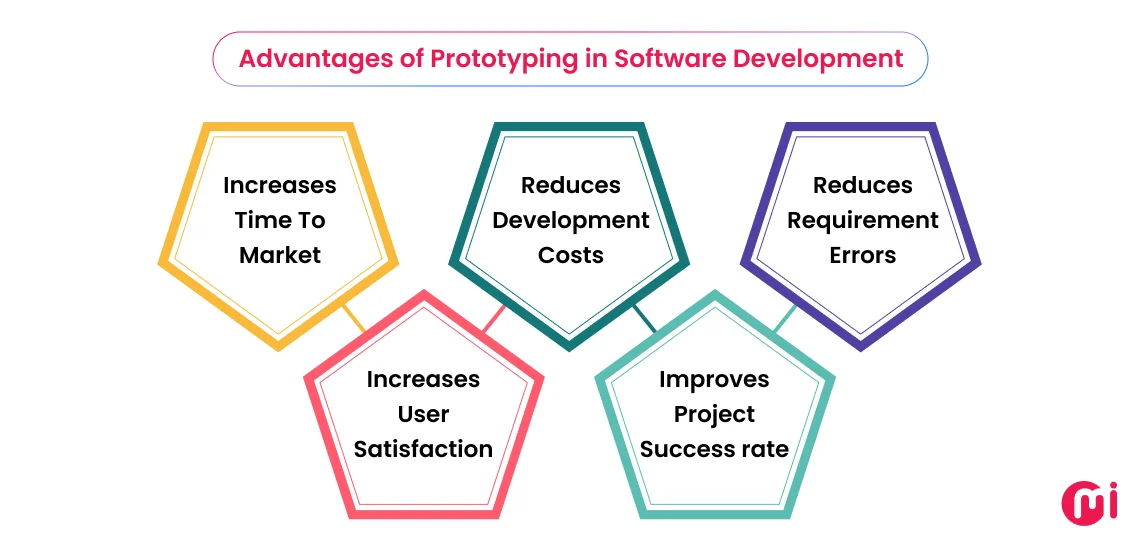
Increases Time To Market
It might sound counterintuitive, but spending time on prototyping can actually help you launch faster. And this works in the favor of fast-moving markets where speed is everything.
How?
By catching issues early, aligning teams quickly, and reducing costly changes later in development. Instead of relying on lengthy documentation or vague feature descriptions, prototypes provide a tangible model of how the product will function. This enables faster stakeholder feedback, clearer communication between business and technical teams, and quicker decision-making. All contributing to shortening the development cycle.
Reduces Development Costs
Prototyping is one of the most cost-effective strategies for reducing waste in software development. By validating ideas early, before committing to full-scale development, organizations can avoid investing in features that don’t deliver value or align with user needs.
Why it matters for businesses:
- Minimizes rework, which is one of the biggest drivers of cost overruns
- Improves scope clarity, reducing the chances of scope creep
- Enables smarter resource allocation, focusing effort on what really matters
All of this saves dollars that could have been wasted in unnecessary development, missed requirements, or building features that users ultimately don’t need.
Reduces Requirement Errors
Misunderstood or incomplete requirements are one of the most common and costly issues in software development. They often lead to functionality gaps, user frustration, and extensive rework late in the process.
It offers several strategic advantages:
- Improves communication between technical and non-technical stakeholders
- Surfaces ambiguities in requirements before development begins
- Reduces costly change requests during or after build
By bridging the gap between business needs and technical implementation early in the process, prototyping significantly reduces the risk of project delays, misaligned deliverables, and budget overruns caused by late-stage requirement corrections.
Increases User Satisfaction
User satisfaction is at the heart of successful software, and prototyping’s sole purpose is to help you ensure you’re building something people actually want to use. By involving end users early in the design process, prototypes give them a chance to interact with the product before it’s finalized. Their feedback helps refine functionality, improve usability, and ensure the end result aligns with real needs.
Here is what a user experience-driven approach to software design offers:
- Validates design decisions through real user feedback
- Improves usability by identifying friction points early
- Builds trust and engagement by involving users in the process
The end result?
Software that feels right to users from day one—boosting satisfaction, loyalty, and long-term success.
Improves Project Success rate
When teams enter development with a clear, tested roadmap, the likelihood of hitting milestones, staying on budget, and meeting user expectations increases dramatically. By validating ideas early, aligning stakeholders, and clarifying technical and user requirements, prototyping significantly reduces the risk of delays, scope creep, and costly rework.
In short, prototyping creates a solid foundation for execution, transforming uncertainty into confidence and improving the chances of delivering a successful, on-target product.
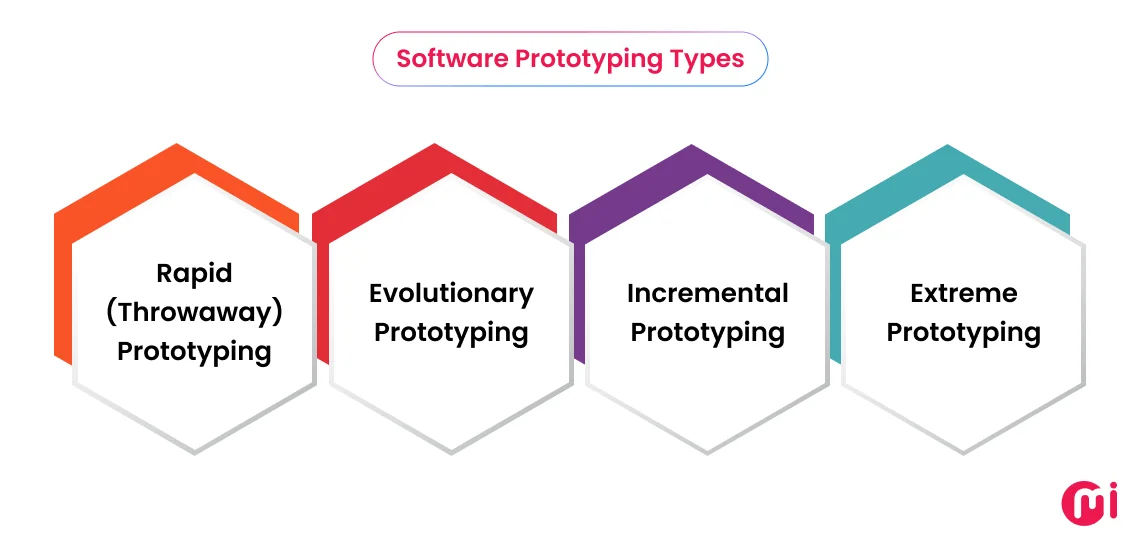
Types of Software Prototyping
There are four main types of software prototyping, namely rapid (throwaway), evolutionary, incremental, and extreme.
Not all prototypes are created equal. Depending on goals, timeline, and technical needs, different types of prototyping approaches can be used in software development to validate and refine your software.
Let’s explore each type of prototyping in detail.
1. Rapid (Throwaway) Prototyping
Throwaway prototyping involves quickly building a simplified version of the software, often using sketches, wireframes, or basic interactive mockups, to explore ideas and gather feedback.
There is an understanding in the team that these prototypes are not meant to be part of the final product and will be discarded once their purpose is served.
It is ideal for initial stakeholder presentations, customer discovery phases, or internal alignment when product concepts are still forming. However, it may be too simplistic for in-depth validation.
2. Evolutionary Prototyping
This method of software prototyping involves building a functional prototype that is continually improved through iterative development.
The prototype built in this approach serves as the foundation for the final product. The subsequent interactions help in adding functionalities or improving the prototypes based on user feedback.
Best suited for projects with evolving or incomplete requirements. Particularly valuable in Agile and Lean environments, where responsiveness to change is key.
However, it does require careful version control and architecture planning, as if iterations are not managed well, it may result in “code debt.”
3. Incremental Prototyping
This approach involves building the software in parts or modules, where each prototype represents a specific feature or component of the system. These individual prototypes are developed, tested, and refined independently, then gradually integrated into the larger system.
It is ideal for large-scale enterprise systems or multi-functional platforms where different teams work on parallel tracks (e.g., user dashboard, admin panel, API layer). It’s a scalable approach that allows for staged releases and testing.
There may be a risk of inconsistencies across modules if not well coordinated.
4. Extreme Prototyping
It is a specialized approach used primarily in web application development. It involves building the application in three structured phases, with a strong emphasis on user interface (UI) and user experience (UX) before integrating business logic or backend systems.
- In the first stage, teams create the static layout of the web app using HTML, mockups, or design tools.
- In the second stage, the screens are made clickable and simulate responses using dummy or hardcoded data.
- In the third stage, once the interface and flow are approved, link the UI to real databases, APIs, or backend services. At this point, the prototype becomes a working version of the actual product.
It helps reduce the frontend-backend misalignment; however, the front-loaded efforts on UI may need adjustment later.
💡What should you consider when choosing the right types of prototyping?
Here is what to consider:
- Project Goals: Ideation or validation? Concept sketches work early on, but UX flows or tech feasibility need higher fidelity.
- Requirement Clarity: Fuzzy specs? Go evolutionary. Locked-in scope? Throwaway or incremental saves time.
- Time & Budget: Tight on either? Low-fidelity or throwaway prototypes give quick wins with less cost.
- Stakeholder Input: Expect ongoing feedback? Choose a method (like evolutionary) that adapts well to iteration.
- Technical Depth: Complex backend? Incremental or extreme prototyping lets you tackle risk in layers.
- Team Workflow: Agile-friendly? Opt for evolutionary or incremental. Waterfall? Start with a throwaway model to lock down requirements.
How to Create a Software Prototype in 7 Steps
Whether you’re building a brand-new digital product or refining an existing system, following a clear, strategic prototyping process can save time, align teams, and uncover user insights early. Below, we break down the key steps that go into creating a successful software prototype, from initial research to final implementation, so your team can build with confidence, not guesswork.
Let’s walk through the 7 essential steps to get your prototype off the ground.
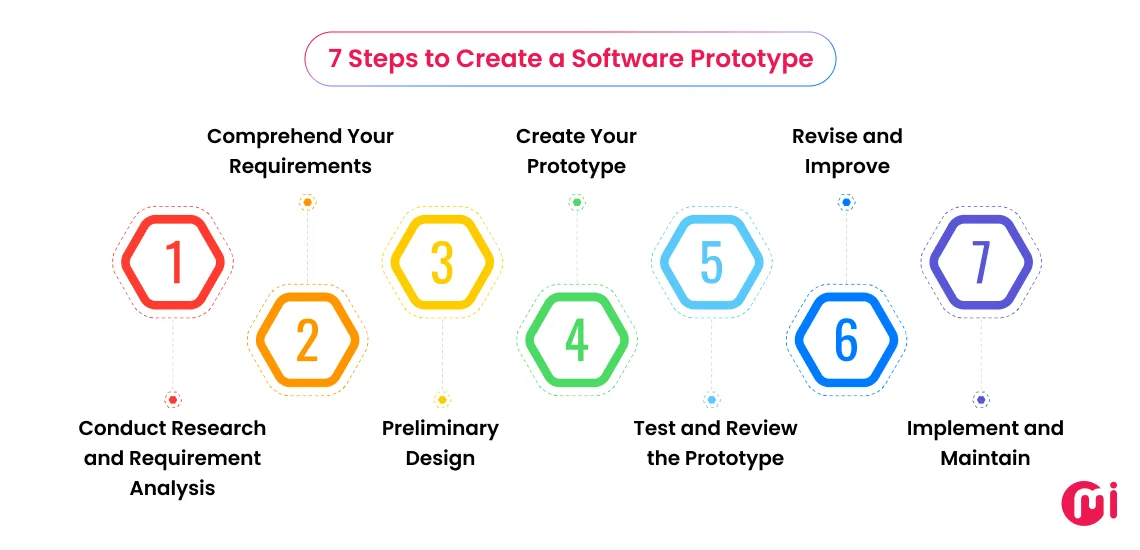
1. Conduct Research and Requirement Analysis
At this stage, UI UX team needs to understand the following:
- Target audience, their demography, pain points
- Stakeholder’s vision and goals
- Identify business drivers (ROI, time to market, revenue targets, etc.)
- Competitors and their software
- Available technologies and tools
- Define functional and non-functional requirements
2. Comprehend Your Requirements
Just gathering information is not enough. You need to translate this raw data into structured, design-ready requirements.
Start by organizing and prioritizing information into a list to get a better understanding of everything. This would include:
- The first thing to do is to categorize requirements (user, business, and technical), tagging them as must-have, nice-to-have, or future enhancements; identifying conflicting or unclear needs for clarification; and more.
- Create user personas, outline primary use cases for each persona, and even map core user journeys.
- Translate goals into functional requirements by identifying the features needed to be included in the prototype.
- Clarify any limitations that will affect your prototype, like, will it be web-only or mobile-first? Are there branding guidelines or design systems to follow? Are there legacy systems or APIs that must be considered?
- Before jumping into design, set clear expectations for what the prototype should validate or achieve.
You’ll now have a well-defined list of what your prototype needs to show, for whom, and why, all grounded in your research. This alignment keeps design focused and purposeful and prevents unnecessary scope creep.
3. Preliminary Design
This step helps translate the well-understood requirements into a visual blueprint.
Start with low-fidelity sketches (on paper or tools like Balsamiq, Whimsical, or Figma). You can sketch the navigation layout, major UI components, and user flow across primary actions (e.g., sign up, checkout) without worrying much about the aesthetics at this stage.
Once your sketches roughly simulate the real user behavior, you can consider converting the sketches into more structured wireframes. Wireframes are still low- or mid-fidelity at this point. As the focus is on structure and not on branding, fonts, or colors yet. You may also want to plan the interaction points like hover states, button clicks, input responses, form validation flows, and more—which you will prototype in the next stage.
Getting quick feedback at this stage helps to gain usability insights, identify flow issues or gaps, get suggestions for simplification, and more. These changes after high-fidelity design can be costlier and more time-consuming.
Learn more about the difference between wireframe, mockup, and prototype.
4. Create Your Prototype
In this step, you translate the preliminary design into a functional model that can simulate the product’s user experience.
Begin with deciding how detailed your prototype needs to be based on purpose and audience: low-fidelity (for quick concept validation), mid-fidelity (for usability testing and layout validation), or high-fidelity (for investor demos, client approvals, or pre-development sign-off).
Based on the chosen fidelity, you can opt for the best-suited prototyping tool. The best-suited tools for low-fidelity are Balsamiq or Whimsical. For mid-/high-fidelity, you can opt for Figma, Adobe XD, Axure, or Framer.
To know more about choosing the optimal prototyping tools, explore our comprehensive guide on choosing the optimal mobile prototyping tool.
If you have a brand style guide or design system, you can set up the design system by importing UI components. You will also have to set type scales, color palettes, and spacing standards. This helps ensure consistency across screens and improves scalability.
Using the prototyping tools and keeping the design system (if applicable) in mind, design the actual screens based on your wireframes and user flows. Ensure you follow UX/UI best practices for layout, spacing, and interaction patterns.
Convert your wireframes into clickable and navigable UI by linking screens with basic navigation (buttons, tabs, links). Further add the modals, popups, dropdowns, and tooltips. Lastly, simulate flows like form submissions, onboarding, or checkout. Also consider adding realistic content across the design.
Check for device responsiveness if the prototype is cross-platform.
Before you take the prototype to external users or stakeholders, do a round of internal walkthroughs and quality checks.
5. Test and Review the Prototype
Once your prototype is ready, test it with real users and internal stakeholders to uncover usability issues and gather feedback.
Start by asking users to perform key tasks and observe where they struggle. Even a handful of sessions can reveal critical flaws in navigation, copy, or flow. At the same time, involve stakeholders to ensure the prototype aligns with business and technical expectations.
Next, analyze the feedback, prioritize changes, and refine your prototype. Focus on fixing friction points that disrupt the user journey.
Look for patterns, not isolated opinions. If multiple users struggle with a specific flow, that’s a signal.
6. Revise and Improve
Now that you’ve gathered user and stakeholder feedback, it’s time to act on it. This step is about refining the prototype to better meet user expectations and business goals.
Start by organizing the feedback into themes, usability issues, content clarity, technical constraints, and visual design. Prioritize updates based on impact: fix anything that blocks the user journey or causes confusion first.
Then, revise your prototype accordingly. This might mean adjusting layouts, tweaking interactions, improving copy, or reworking entire flows. If needed, run another round of quick testing to validate the changes.
The goal isn’t perfection; it’s progress. Each iteration brings you closer to a version that’s both user-friendly and dev-ready.
7. Implement and Maintain
Once your prototype has been tested and refined, it’s time to transition from concept to reality. This step involves handing off the validated prototype to your development team to begin building the actual product.
Ensure that:
- All design assets are organized and documented
- User flows and key interactions are clearly mapped
- Any technical constraints or learnings from the prototype phase are communicated
But implementation isn’t the end. As your product evolves, your prototype should too. It becomes a living reference for future updates, new features, and stakeholder discussions.
Maintaining your prototype ensures consistency, saves time in future iterations, and supports ongoing alignment across product, design, and engineering teams.
CEOs and CTOs also referred: How to Make an App Prototype
What Are the Best Practices to Follow for Prototyping in Software Development?
Prototyping can streamline product development and reduce risks, but only when it’s done the right way. Best practices like defining clear goals, starting simple, involving stakeholders early, and more can help you ensure that your software prototyping process moves in the right direction.
Here are some best practices you can consider following:
- Don’t prototype just for the sake of it. Identify what you want to validate: user flow, functionality, visual design, or technical feasibility. This keeps the process focused and efficient.
- Begin with wireframes or sketches to map out ideas quickly without over-investing in details. Low-fidelity prototypes are great for brainstorming and early feedback.
- Bring in product owners, developers, and end users during the prototyping phase. Early feedback helps align expectations and spot gaps before development starts.
- Good prototypes go beyond aesthetics; they test how real users will interact with your product. Prioritize usability and clarity over polish in early iterations.
- Treat your prototype as a learning tool. Use it to gather insights, run usability tests, and validate assumptions. Then refine based on real-world feedback, not gut feelings.
- Select tools that suit your prototype’s goals, whether it’s Figma for UI flows, ProtoPie for interactions, or Webflow for semi-functional web prototypes.
- Work closely with developers to ensure your prototype doesn’t promise what can’t be built. Aligning design with real-world constraints saves time later.
- Each iteration teaches you something. Document feedback, design decisions, and technical insights so the team can refer them during development.
Challenges of Prototyping in Software Development and How to Overcome Them
While prototyping offers tremendous value in shaping better software products, it’s not without its challenges. From unclear requirements to technical limitations and tight budgets, teams often encounter roadblocks that can undermine the purpose of prototyping if not addressed early.
The good news? Most of these challenges are manageable with the right mindset, tools, and collaboration in place. In this section, we’ll break down the most common issues teams face during prototyping and offer practical ways to overcome each one.
1. Unclear Requirements and Misinterpretation
Either your prototype does not match your vision or, to be precise, does not solve the pain point it was meant to solve.
Reasons are many, each stakeholder having a different vision of what the prototype should be like being one of the biggest contributors to it. As this leaves room for varied interpretation, which can leave the outcome misaligned.
How to Overcome It:
Communication and continuous collaboration are the keys. If need be, arrange for collaboration workshops to ensure all stakeholders are on the same page. Ensure you document the functional and non-functional requirements. Also, keep on updating the document with reviews and corresponding updates during the process.
2. Cost and Time Constraints
Though you have opted for prototyping to visualize and explore your idea before investing in making it fully functional, software development teams are often working against the clock and a tight budget. This is when they don’t see budget overruns and missed deadlines coming.
A lack of a clear roadmap and unrealistic deadlines increases the possibilities of unnecessary iterations, which can’t be met with unrealistic timelines. Another reason is investing right into high-fidelity models; the cost of advanced software prototyping tools would only add to the budget overruns. That too without the certainty that the prototype of what actually would be translated into final software.
How to Overcome It:
Start small. Prototypes don’t have to be high-fidelity or fully interactive from day one. Even a rough sketch or a basic clickable wireframe can help validate ideas before you commit time and resources to build the real thing.
Also, set clear goals for your prototype. Are you testing a concept? or Validating a user flow? Knowing your objective helps keep the effort focused and efficient.
3. Inefficient Iteration Cycles
Prototyping is all about trying, testing, and tweaking, but when iteration cycles become too slow or disorganized, the whole process can lose momentum. Maybe feedback takes too long to arrive, or changes aren’t tracked properly. Sometimes, you end up making the same mistakes over and over because lessons from earlier versions weren’t captured.
How to Overcome It:
The first thing to do is to adopt agile software development methodology. This makes iteration cycles more manageable, with everyone knowing how to approach them. Use tools that make it easy to share updates and collect feedback. You can also opt to keep the prototype design modules to make the updates easy.
A structured, repeatable process—build, test, learn, repeat—keeps things moving forward without the chaos.
4. Technical Feasibility Issues
There is a possibility that maybe the design relies on a feature your current tech stack doesn’t support, or it would take months of work to implement something that looked easy in the mockup. A prototype might rely on heavy real-time data processing, advanced animations, or complex integrations that your existing infrastructure can’t support without major rework.
This often happens when the prototype is built in isolation, without input from engineering. It’s like designing a high-performance engine without checking if it fits under the hood.
How to Overcome It:
Loop in developers from the very beginning of the prototyping phase. Their insights can help assess whether a concept is technically viable or requires significant backend changes, third-party services, or architectural shifts.
Using lightweight technical validation alongside design—like quick proof-of-concept code snippets or tech spikes—can help verify assumptions early.
Make technical feasibility part of your validation criteria. A feature that can’t be implemented within project constraints (budget, timeline, stack) should either be re-scoped or shelved before you move too far ahead in development.
Should You Prototype It Yourself or Collaborate with a Software Development Company?
We get it. When you’ve got a software product idea or a project on the table, the instinct is to look inward. Do we already have designers? Do we already have devs? Can we allocate a team? Maybe we can build it ourselves. And sometimes that does make sense if the scope is tight, the team has capacity, and the risk is low.
But here’s the thing: building a prototype or software isn’t just about coding. It’s hiring, onboarding, choosing the right tech stack, maintaining quality, managing velocity, fixing bugs, testing for edge cases, handling security, and staying compliant. And all of that starts to eat away at time and focus, especially if development isn’t your core business.
Some teams try to manage it internally but often run into bandwidth issues, unclear requirements, or rework when feedback comes in late.
When companies work with a dedicated software development services partner, it’s not because they can’t build or prototype it themselves. It’s because they have an option to make a better choice.
You get to hire a dedicated software development team that’s done it before, across different industries, challenges, and platforms. The team knows where projects get stuck, what to validate early, and how to avoid expensive mistakes.
At MindInventory, for example, we work with enterprises day in and day out across industries to prototype, build, and scale custom software. We understand the nuances of turning concepts into validated, workable models that save time and reduce risk.
It’s also about momentum. You don’t lose 2 months of hiring. You don’t lose another 3 trying to stitch together a delivery pipeline. You don’t have to slow down your core team. Instead, you can make a choice that allows you to move quickly, with clarity and structure, toward something that’s production-ready.
If you’re at a stage where you’re evaluating the build path, it might be worth a short conversation. Let’s talk through your goals and challenges and see where we can genuinely add value.
Wrap Up of Software Prototyping
Prototyping isn’t just a step in the software development process; it’s a strategic advantage. When done thoughtfully, it bridges the gap between concept and execution, reduces risk, clarifies requirements, and sets the foundation for building the right product the right way.
Whether you’re building a brand-new product or refining an existing one, prototyping gives your team the clarity and confidence to move forward. And when paired with the right expertise and collaboration, it can transform good ideas into great solutions faster and more efficiently.
If you’re considering your next move, think of prototyping as your low-risk, high-impact starting point.
FAQs on Prototyping in Software Development
A software prototype is an early version of a software application created to visualize and test key fA software prototype is an early version of a software application created to visualize and test key features before full development. Prototyping is especially useful when you want to validate ideas, gather user feedback, or reduce development risks.
A software prototype is particularly useful in situations where requirements are unclear or subject to change and where the system involves extensive user interaction. It serves as an effective approach for demonstrating the feasibility of a software design and allows for early detection of potential problems and usability issues. By using a prototype, teams can identify and address these concerns early in the development process, thereby minimizing costly rework and revisions later on.
Proof of Concept (POC) is basically about validating that an idea is technically feasible and can be built. A prototype takes that a step further, helping you test usability, gather early user feedback, and refine requirements before you start building the actual product. It’s a preliminary version of your product that demonstrates design, user flow, and key features, but not necessarily with full functionality. Then, the Minimum Viable Product (MVP) is the first functional version of your product. It helps deliver just enough features to satisfy early users and gather real market feedback.
The key trends in prototyping software are AI-assisted prototyping, rapid prototyping, low-code/no-code development, real-time collaboration using cloud-based tools, hyper-personalization, generative design, AI-powered automation, and more.
The commonly used tools and technologies used to create a software prototype are Figma, Adobe XD, Sketch, Framer, Proto.io, nVision, Axure RP, Webflow, and more.
Yes, creating a software prototype can impact project timelines and budgets, mostly in positive ways when done strategically. The positive impacts include faster alignment early on, reduced rework, accelerated decision-making, lower development costs, efficient resource allocation, early user testing, and more.
